Easy to Install Kichler LED Tape Light
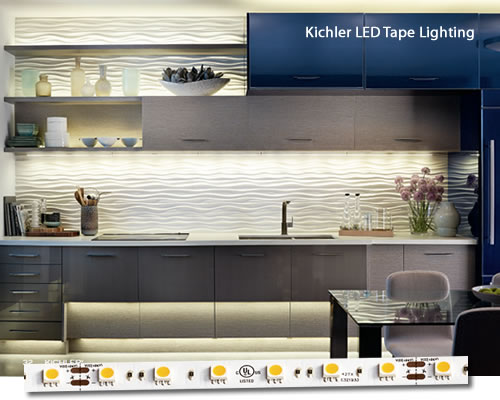
Easy to Install Kichler LED Tape Light
Kichler LED Tape Light is an excellent product!
- Installer friendly
- Plug-and-play power supply
- 3M™ brand adhesive backing
- Many available additional accessories
- Dimmable tape light power supply
- In-wall rated wires are out of view (and costs less than competitive wire options)
Kichler 12V LED Tape Light Installation Instructions for Dry Locations
All installations should comply with national and local electrical codes. If you have any doubts concerning installation, contact a qualified, licensed electrician.

Underneath Cabinet Installation
Planning
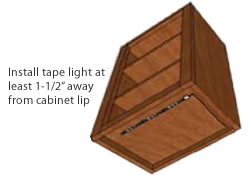
Install tape light at least 1-1/2″ away from cabinet lip to prevent shadowing on counter top surface.
Where will you put the power supply?
Determine location for NRTL Listed Class 2, 12V DC power supply.
Measure from the power supply to where the LED tape will begin.
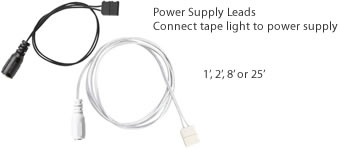 Determine length of supply lead wire that will be needed.
How many pieces of tape will you need?
How long is each piece?
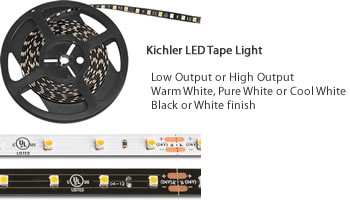
Determine the number and length(s) of tape.
Voltage drop limits the linear run length of 12V DC fixtures to about 16 feet, determined using a 60W power supply & a 1′ power supply lead with a continuous linear run of LED tape light.
Measure any distance between the pieces of tape to connect them.
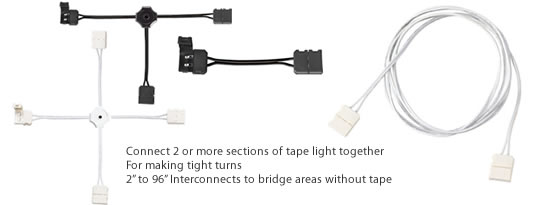
Determine the lengths of leads and connectors that will be needed.
(Supply leads and interconnects are not listed for In-Wall use.)
Add up the wattage to choose the right power supply.
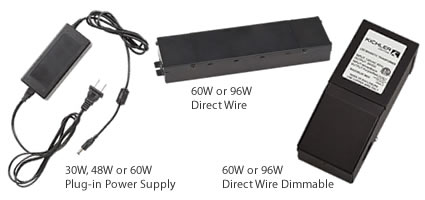
Determine Power Supply
Total wattage of tape light should not exceed power supply wattage.
Determine the total wattage of tape light by multiplying the total number of feet of tape by the wattage listed for the tape, 1.5 watts per foot or 3 watts per foot.
Preparation
Prepare the location that the LED tape light will be installed.
Thoroughly clean and dry any area adhesive backed tape will be applied to, using a non-petroleum based product.
Installation
1 – Install power supply
The power supply should be installed by a qualified electrician and be installed in accordance with national and local electric codes.
Refer to the power supply installation instructions for further details.
2 – Run supply lead wire from power supply to beginning of tape light run.
Do not connect lead wire to power supply yet.
3 – Prepare each tape section
Measure and (if necessary) cut the first section of tape light, leaving a minimum of one inch of space on each end for connections.
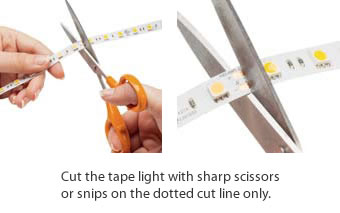 To cut the tape light, use a pair of sharp scissors or snips and cut on the dotted cut line only.
4 – Prepare tape
Completely remove 1/4″ of the adhesive backing from either end of the tape that will be inserted into the connector.
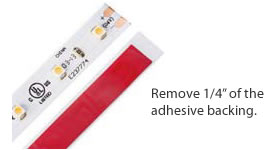 If the adhesive backing is not removed, this may cause damage to the connector.
5 – Connect tape light to supply lead wire
Make sure +/- symbols on tape light line up with the +/- symbols on the connector of the supply lead wire.
How to use the Connectors
Open connector gently using your finger nail.
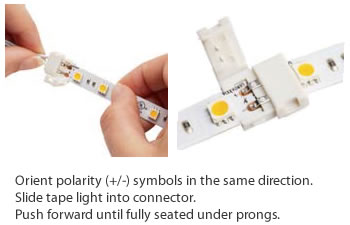
Slide tape light into front of connector making sure that the tape is kept flat when placed in the connector’s guides.
Gently push the tape light forward until the tape light is fully seated in the connector and is under the prongs.
Check that the connection is secure and that polarity (+/-) symbols are oriented in the same direction.
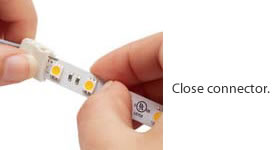
Close connector.
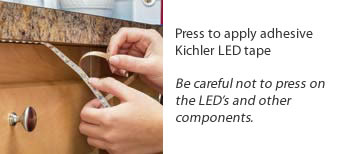
6 – Apply LED Tape
Remove 3M backing from tape light and apply.
Make sure to press between the LED’s and other components.
Pressing on the LED’s and other components will result in damage to the tape.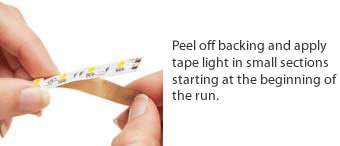
For best results, peel off backing and apply tape light in small sections starting at the beginning of the run.
Avoid using excessive force to prevent damage to LEDs and other components.
Follow the same instructions for any additional sections of tape light.
7 – Connect the Power and Turn it On!
Double check that all connections are secure and that all polarity (+/-) symbols are oriented in the same direction.
Connect power supply lead to power supply and turn on.
That’s how easy it is to install Kichler Undercabinet Tape Light!
24 volt systems and RGB systems are very similar.
LED Tape is easy to install, with smart connections and features that streamline placement. Dry, damp, and wet location LED tape light options offer versatility and flexibility in design. High or low output choices shine brightly and efficiently without compromising the quality of light. Multiple Kelvin temperatures and an assortment of unique colored light options makes it easy to add the ideal lighting accent to your space.
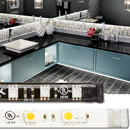
 Kichler Interior Dry Location LED Tape Lighting
Kichler LED Tape Lighting is versatile in design and flexible at every point in installation. Indoor/dry applications can be easily cut and connected, so you can install jobs without interruption. 3M™ adhesive backing assures an easy peel and stick application that goes on strong and smooth – and stays that way.
Easy to Install Kichler LED Tape Light
- Installer friendly
- Plug-and-play power supply
- 3M™ brand adhesive backing
- Many available additional accessories
- Dimmable tape light power supply
- In-wall rated wires are out of view (and costs less than competitive wire options)
 Kichler Damp Location LED Tape Light
Damp location tape features a special covering that protects the components from dust and moisture, making it ideal for kitchens, baths, or bar areas. Damp location LED tape offer versatility and flexibility in design. High or low output choices shine brightly and efficiently without compromising the quality of light. Multiple Kelvin temperatures makes it easy to add the ideal lighting accent to your space. LED Tape is easy to install, with smart connections and features that streamline placement. In every way, Kichler LED Tape is versatility that delivers beautiful results.
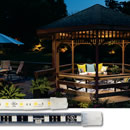 Kichler Wet Location LED Tape Light
Kichler Wet Location LED Tape Light is rated IP67. It is completely encased and features waterproof connections, helping you bring lighting interest to decks, patios, pool areas and more. Order shorter tape light runs where needed for outdoor/wet projects, then use versatile watertight connectors. Kichler tape light incorporates many installer friendly features such as plug-and-play power supplies and tape light with 3M brand adhesive backing. Kichler offers a large variety of additional accessories to make installations even easier. Wet Location tape mounting clips secure Wet Location tape to the mounting substrate.
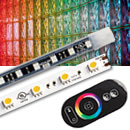
Kichler Color Changing LED Tape Light
Kichler color-changing RGB LED Tape creates a full-range of highly saturated colors that can be programmed to many different modes and controlled via radio frequency remote. Customize a business or home with static color or color-changing RGB LED tape and add flair in nearly any space. Available for Dry, Damp or Wet Location.
Share this:

Discover more from my design42
Subscribe to get the latest posts sent to your email.