How to Easily Install a Ceiling Medallion
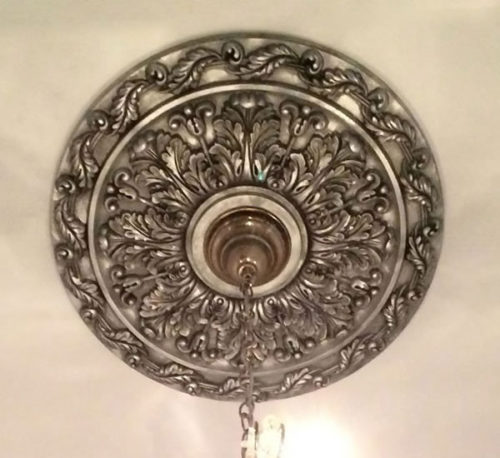
I love the look of traditional plasterwork and millwork. Now, you can get the look of fragile plaster in molded polyurethane – lightweight, easy to install and surprisingly inexpensive! You can install a ceiling medallion as an architectural focal point to your dining room, entry, bedroom, even over a bath!
You really can get a ceiling medallion for under $10.00! Really!
Ceiling Medallions as low as under $10.00:
- 7″ to 12″ Ceiling Medallions
- 12″ to 15″ Ceiling Medallions
- 15″ to 17″ Ceiling Medallions
- 17″ to 19″ Ceiling Medallions
- 19″ to 21″ Ceiling Medallions
- 21″ to 24″ Ceiling Medallions
- 24″ to 26″ Ceiling Medallions
- 26″ to 30″ Ceiling Medallions
- 30″ to 35″ Ceiling Medallions
- 35″ to 70″ Ceiling Medallions
- Contemporary Ceiling Medallions
These instructions do not include taking down the light and putting it back up again.
You Need:
- Ladder or something else safe to stand on and reach the ceiling
- Tape measure or yardstick
- Pencil
- Drill, hole drill bit or hack saw if your medallion is not pre-cut
- Screws the right depth for your medallion
- Screwdriver
- Polyurethane construction adhesive (water clean-up liquid nails)
- Latex spackle, calk or wood filler
You may need:
- Touch up paint
- A longer threaded tube to reinstall the light
Important: Make sure you turn off the electricity before you remove an electrical fixture. Not just the switch. Flip the breaker.
Finish your Medallion BEFORE you put it up.
Most medallions are already pre-finished in white, but if you decide to paint, stain or faux finish your medallion, do it before installation. It’s always easiest not to paint over your head.
Cut a center hole (if you don’t have one)
Some medallions are split (in two pieces) or have a hole pre-cut. If your medallion is not, use the light fixture canopy to mark the hole. Draw a circle with a pencil, then cut inside the hole. It needs to be big enough to make your electrical connections, but not bigger than your canopy, so the hole doesn’t show. Seems obvious, but just in case. You can cut the hole with a door knob hole drill bit or start the hole with a drill, then cut with a jig saw. It doesn’t have to be fancy, since it won’t show.
Measure and mark the ceiling where the medallion will go.
Use a tape measure or yard stick to measure from the electrical box to make sure you are centered. If you use chalk to mark, you can just brush it off when you are done.
Some instructions recommend a stud detector to locate ceiling joists. This is not necessary unless your medallion is very large and heavy.
Make sure the medallion will fit flush.
Center the medallion on the ceiling against the electrical box to make sure it is flush. If the box pushes against the medallion, you will need to trim the medallion. You can mark where you need to trim by putting some lipstick on the edges of the electrical box so that it will mark the medallion where you need to trim it.
Put the screws in place.
Start the screws on the medallion front, so that when it is over your head, the screws are ready to go. Most medallions are soft enough that you don’t have to drill a pilot hole, just push them in. If you put the screws in an area of the medallion that is not smooth, they won’t be obvious.
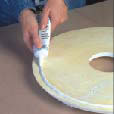 Apply adhesive
Flip the medallion over and put a bead of adhesive (water clean-up liquid nails) on the back about ½” from the edge. If the ceiling is perfectly smooth, a ¼” bead will be fine. The more texture you have, the more adhesive you will need. Add another line of adhesive about 2” in.
Some instructions recommend double-stick tape. This is not the easiest way to do this. It will only stick if your ceiling is very smooth and clean. It doesn’t adhere well to most ceilings. And you can’t slide the medallion into place.
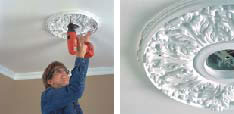
Put up the medallion
Center the medallion in location and screw in the screws, starting with the ones across from each other (12:00 then 6:00, 3:00 then 9:00…) Screw the screws in until they are just below the surface.
Some instructions recommend finish nails. This is not the easiest way to do this. It is not easy to hammer over your head and it is very easy to damage the medallion. The finish nail has no real head to keep the medallion secured to the ceiling.
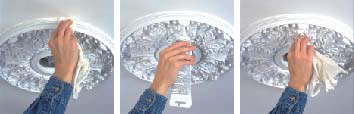
Clean up and touch up
If any glue came out when you pushed the medallion up or slid it into space, wash it off now. (This is why it is important to use water clean-up liquid nails.)
Put a little latex spackle, calk or wood filler over the screws and smooth them till they aren’t visible. You can just do this with your finger. Then touch up the paint.
Wait
Give it a few hours for the glue to dry before you put the light fixture or fan back up. Don’t forget and flip the breaker back on and fry yourself. You will likely need to replace the threaded tube you have with a longer one.
Installing Our Ceiling Medallion >
Share this:

Discover more from my design42
Subscribe to get the latest posts sent to your email.